Sunday, September 27, 2009

Moment In Time


I did this layout using papers and embellishments from TPC Studios, mainly from their Ancestral collection, and distressed the papers to give the layout an even more "aged" feel. And of course I just had to add my favourite Prima flower and flutter vine!


I sprayed some glimmer mist in Iridescent Gold on the leaves to give them the same golden shimmer as the flutter vine, but unfortunately it's not really visible from the photo.


And I added little touches of metal embellishments like a key and heart-shaped lock (tied to the vine with some lace), as well as little adhesive brads on the laces and ribbon.


Materials used:
Patterned Papers - TPC Studios - Ancestral Collection - Remember Moments Quote, Key Stripe, Teal Brocade; TPC Studios - Mr & Mrs Collection - Our First Dance
Die-Cut Paper - Crate Paper - Lemongrass Collection - Lemon
Flower and Leaves - Prima
Vine - Prima Flutter Vine
Metal Embellishments - TPC Studios
Adhesive Brads - TPC Studios
Flourishes - Prima Say It In Pearls
Ribbon - TPC Studios Ancestral Collection
Laces - Unknown
Alphas - American Crafts Thickers - Nutmeg Glossy Letter Stickers in White
Others - Tim Holtz Distress Ink in Frayed Burlap, EK Success 3D Foam Dots, Tattered Angels Glimmer Mist in Iridescent Gold

Saturday, September 26, 2009

Scrapbook News And Review Magazine

Scrapbook News and Review Magazine is celebrating the Grand Opening of their brand new website, and will be having a double-header, double issue FREE weekend from this Saturday, September 26, 2009 until Sunday, September 27, 2009. Check out all the fun and excitement at http://www.scrapbooknewsandreview.com./ and see the inside of the magazine for FREE. This Special Double Issue -- their largest issue of the year -- debuts on Saturday, September 26, 2009 at 8:00 p.m. EST and from the moment of debut until 8:00 p.m. EST on Sunday, you'll have complete access to the world's largest online scrapbooking magazine. With over 400 layouts (scrapbooking and digital), cards, stamping and altered art projects, product reviews, manufacturer spotlights and more, you'll be amazed at the incredible inspiration, fabulous tips, tricks and techniques, amazing tutorials and exciting eye candy. Go check it out!

CustomCrops.com

Some exciting news - I've just joined the DT for CustomCrops.com! This is a wonderful online store that also features articles by their designers to show you, step by step, how to reproduce their projects posted. There are some great designers there, so naturally, I was ecstatic when their owner Kelly approached me to join their team. If you haven't already, do pop by their site!

Thursday, September 24, 2009

Cherish


I recently discovered some old photos of my younger DD and decided I just had to scrap them! And I decided to use my Prima stash for the layouts as I had recently bought a fortune in Prima goodies! Again, I used a mixture of Prima flowers and flutter vine for this layout, and don't you just love that gorgeous, sparkly butterfly?


I stickled the butterflies on the patterned paper as well as the title "Cherish" with Ranger's Stickles in Antique Linen to match the colour and shimmer of the large butterfly as well as to add some texture to the paper, and inked the edges of the flower below the large butterfly to match the colours of the flowers on the flutter vine.


And I propped up the photo and matting with 3D pop-up dots for some added dimension.


Materials used:
Patterned Papers - Prima Paradise City Collection - Morning Chirps, Prima Tropics Collection - Sweet Apple
Fabric - Prima Canvas Screenprint
Cardstock - Bazzill
Flowers and Vine - Prima
Butterfly - Prima
Laces - Prima
Metal Embellishment - Making Memories
Sticker Quote - 7 Gypsies 97% Complete Stickers - Vacation
Others - Ranger Stickles in Antique Linen, Tim Holtz Distress Ink in Aged Mahogany and Frayed Burlap, EK Success 3D Foam Dots

Wednesday, September 23, 2009

In Bloom


I did this very Prima layout last week. Almost everything here is from Prima, except for the title alphas and the backing cardstock. I just love the new range of papers and vines and flowers from Prima! Aren't they just gorgeous?


The flowers here are a mix of some of the older with the new collections.


I did alot of tearing for this layout, and created a "frame" for the photo, which is then surrounded by all the flowers, lace and vines.


I curled the edges of the tears and the corners of the papers for a distressed look and also for some added dimension and "character".


Materials used:
Patterned Papers - Prima Indeed Collection - Daydream, Enchanted
Cardstock - Bazzill
Flowers - Prima
Vines - Prima Flutter Vines
Lace - Prima
Title Alphas - American Crafts Thickers - Daiquiri Foam Letter Stickers

Monday, September 21, 2009

Winter's Playground


My final layout as a DT member of 52 Sketches 52 Weeks. It's been such a wonderful two terms that I'm actually quite sad to be leaving. But, other personal commitments dictate that I must! And as Julie says, there will always be future calls! She and the other DTs have been such a pleasure to work with that I'm surely gonna miss them, but do check out the new DTs that will be joining. I happen to know some of them are fantastic scrappers and I'm sure you'll love their work!

Now, back to this week's Sketch #38.


I knew immediately what I wanted to do with it when I saw it. I used papers from Webster's Pages' Christmas collections, and embellished with pearls and butterflies.


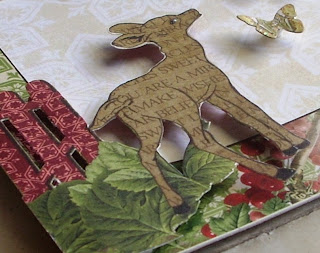
As it is a 4-photo layout, it needed little embellishments. But to give the layout more dimension, I used pop-up dots for the photos, butterflies and the little deer at the corner.


I also applied Stickles to the butterflies for some texture and shimmer.


And check out this week's prize from Scrap Attack Scrapbooking. Isn't it gorgeous?


So do go check out the challenge!

Materials used in my layout:
Patterned Papers - Webster's Pages Winter's Wings Collection - Swan's Lake, Season Of White, My Promise; Webster's Pages Home For The Holidays Collection - Wish Upon A Star
Die-Cut Shapes - Webster's Pages Holiday Die-Cut Sticker Shapes
Cardstock - Bazzill Basics
Butterflies - Webster's Pages Holiday Die-Cut Sticker Shapes (pasted on transparency and cut out); Kimberly Poloson Flocked Cardstock - Old Fashioned Flowers - Butterflies
Pearl Flourishes - Prima Say It In Pearls
Alphas - American Crafts Thickers; Provocraft Alphabitties Stickers - Licorice
Others - EK Success 3D Foam Dots, Tim Holtz Distress Ink in Frayed Burlap, Ranger Stickles in Icicle

Sunday, September 20, 2009

52 Sketches Sneak Peek

Here's a sneak peek at my next 52 Sketches 52 Weeks layout! It's a really pretty sketch, so don't forget to check their blog.


Saturday, September 19, 2009

Tutorial - Embellishing Chipboards

Here's another tutorial I did for 52 Sketches 52 Weeks, on 26 August. I've been wanting to do a tutorial on my layout "Butterfly Sonata", simply because I've had a few queries on how I did the embellishments for the butterflies, so I took this opportunity to do it here......


This “tutorial” looks at some of the different ways in which you can embellish chipboards. I will actually be working on only one layout, and giving you some ideas on how you can use the differently embellished chipboards on the same layout!

To begin, you will need:

• Glossy Accent
• Liquid Craft Glue
• Tape Adhesive
• Gesso (if desired)
• Acrylic Paint (your choice of color)
• Distress Ink (your choice of color)
• VersaMark Watermark Stamp Pad or any Glue Pad for stamping
• Utee (if available)
• Heat Gun (if available)


Also:

• Raw chipboards of your choice (I’m using some Maya Road butterflies)
• Any stamp(s) of your choice
• Stickles (your choice of colors)
• Any embellishments you desire (I’ve chosen to use, among others, pearls, sequins, and different forms of glitter)


I always start by applying Gesso as a base for my chipboards, as I find it easier to apply paints and embellishments on a white background, to get the full effects of their colors. But you can skip this step if you so wish, as the effects of certain colors on raw chipboards can be just as interesting.


After applying Gesso, I proceeded to paint only the chipboards that need painting, in my chosen color(s).


Now we’re ready to start embellishing the chipboards.

For the first butterfly, after painting the chipboard wings and body of the butterfly, I used VersaMark to stamp on the body and then applied Utee to the stamped portion and embossed it using a heat gun. I then applied stickles on the embossed bits for some added sparkle and texture. If you do not have a heat gun and/or Utee, you can just stamp on the chipboard with ink without embossing, then apply stickles. Or you can just apply patterns directly onto the chipboard with stickles.


After attaching the body to the wings, I used liquid craft glue to glue on a string of pearls on each wing, starting from the outline of the wing and working my way inwards. This is a bit tricky as you will need to hold the pearls in place while the glue dries!


I finished the butterfly with Prima’s Say It In Crystals as the butterfly’s feelers. I attached the swirls to a piece of firm transparency, and then cut it out and attached the lower part of the transparency to the back of the butterfly.


For the next butterfly, after painting, I covered the wings with tape glue and sprinkled fine glitter on it generously.


I then used liquid craft glue to attach a pattern of sequins to the body and wings. I used strings of sequins so as not to have to glue the sequins down one by one – lol! I then used Prima’s crystals again for the feelers.


For the third butterfly, I covered the body of the butterfly with distress ink, dabbed the entire piece onto my VersaMark pad, and then poured Utee on it and embossed the entire body using a heat gun. If you do not have Utee and/or a heat gun, you can use Glossy Accent instead. It takes longer to dry, but the effect is almost the same.


After glueing the body to the wings, I then applied Glossy Accent to the wings and sprinkled Beadazzles micro beads all over, to cover the entire surface of each wing. You can possibly use liquid craft glue as an alternative to Glossy Accent, but tape glue will not suffice as the micro beads are coarser in texture and heavier than the fine glitter I used for the second butterfly.


For the feelers, I used the same string of pearls that I used for the first butterfly, attaching it to the back of the body with craft glue.


For the next butterfly, I painted the wings and sprinkled some glitter on it while the paint was still wet, and then added gems to decorate. Instead of sprinkling glitter, you can actually use a brush to spread stickles over the dried paint if you like. I then painted the body and glued on beads using liquid glue, and then used a string of butterfly-shaped crystal beads for the feelers.


For yet another butterfly, I glued fabric onto the wings, stickled the patterns on the fabric and then added crystal flourishes. I then painted and stickled the body, added crystals, and used pearls for the feelers.


For the last butterfly, I applied distress ink to just the edges of the wings, stamped on it, and then again dabbed the entire surface with my VersaMark, poured Utee on it and embossed it. Again, you can use Glossy Accent as an alternative. I then silver-embossed the entire body (same method as with the Utee only using silver embossing powder), and added some design to it with stickles. I used a piece of ribbon folded in half for the feelers.


Now, how many chipboards can you use in a single layout, you might ask? In addition to the six butterflies above, I also embellished a piece of Maya Road flourish chipboard for this layout. For this, I lightly applied distress ink on the painted chipboard for depth of color, and then added flowers and crystals for embellishment.


And finally, I also painted the alphas which I used for the title of the layout, with dark brown acrylic paint, and stamp embossed some music notes in silver on alternate letters. I then added crystals for the rest.


And here’s a look at the finished layout – 7 chipboards in all plus the alpha letters for the title!


I hope you’ve enjoyed this “tutorial”, and I’m looking forward to seeing what you do with your chipboards! Enjoy! :)

Thursday, September 17, 2009

Some Good News!

I received news yesterday that some of my layouts will be featured on Scrapbook News and Review Magazine's Special Double Issue, which will be their largest issue of the year! I'm so excited! But more on that later.

Today, I just heard from Julie at Inspirational Craft that my blog is being featured there - http://inspirationalcraftblogs.blogspot.com/2009/09/veronicas-treasured-moments.html. I'm truly honoured! She's been featuring some really fabulous blogs on Inspirational Craft, so if you haven't visited them, do pop by - so many wonderful inspirations there.

Tuesday, September 15, 2009

Say Cheese & Smile!


So I finally decided to use my Graphic 45 papers! Their Domestic Goddess collection is so pretty that I decided to do a simple layout with minimum frills, to showcase the designs of the papers. I did, however, apply Glimmer Mist to the butterflies and flowers for a little bit of shimmer (though you can't see it very clearly from the photo).


And I used the camera lens from their Communique paper as I thought it was very appropriate for the title of the layout. Must say I'm quite happy with my first attempt at using G45 papers!


Materials used:
Patterned Papers - Graphic 45 Domestic Goddess Collection - Yours Truly, Tea Time, Quilting Bee; Graphic 45 Communique Collection - Communique
Cardstock - Bazzill Basics
Butterflies - Kimberly Poloson Flocked Cardstock - Old Fashioned Flowers - Butterflies
Flowers - Prima Gypsy Petals
Laces - My Mind's Eye Laundry Line Collection, Prima
Alphas - Prima Alphablends in Cream, SEI Puff Alphabet Stickers in Cranberry
Others - Tattered Angels Glimmer Mist in Iridescent Gold, Tim Holtz Distress Ink in Frayed Burlap, EK Success 3D Foam Dots

Thursday, September 10, 2009

LOTW

My layout "Delight" is this week's Layout of the Week #43 at Made With Love.

Tuesday, September 8, 2009

White World


Another early winter layout I did over the weekend, using the new winter papers from Webster's Pages. The photo is of my older DD and me taken during our trip to Furano in Japan in 2002. And yes, we actually built that snowman ourselves! And don't you just love the new crystal vines from Prima?!


I cut out the paper backing for the photo to match the inner shape of the "frame", and extended this to the backing for the title sticker too. I then found the perfect brads for this layout, from Bo Bunny! And I stickled the large flower on the bottom right to match the glittered Christmas flowers and leaves, all from Prima.


Materials used:
Patterned Papers - Webster's Pages Winter's Wings Collection - My Promise, Season Of White; Webster's Pages Home For The Holidays Collection - Wish Upon A Star; Graphic 45 Christmas Past Collection - Deck The Halls
Flowers and Leaves - Prima
Brads - Bo Bunny's Candy Brads
Crystal Vines - Prima
Title - Adornit Carolee's Creations - Snowy World Stickers
Others - Tim Holtz Distress Ink in Frayed Burlap and Aged Mahogany, EK Success 3D Foam Dots, Ranger Stickles in Icicle, Provocraft Halfabitties - Rat-a-tat Half-a-bitty