This “tutorial” looks at some of the different ways in which you can embellish chipboards. I will actually be working on only one layout, and giving you some ideas on how you can use the differently embellished chipboards on the same layout!
To begin, you will need:
• Glossy Accent
• Liquid Craft Glue
• Tape Adhesive
• Gesso (if desired)
• Acrylic Paint (your choice of color)
• Distress Ink (your choice of color)
• VersaMark Watermark Stamp Pad or any Glue Pad for stamping
• Utee (if available)
• Heat Gun (if available)

Also:
• Raw chipboards of your choice (I’m using some Maya Road butterflies)
• Any stamp(s) of your choice
• Stickles (your choice of colors)
• Any embellishments you desire (I’ve chosen to use, among others, pearls, sequins, and different forms of glitter)
• Raw chipboards of your choice (I’m using some Maya Road butterflies)
• Any stamp(s) of your choice
• Stickles (your choice of colors)
• Any embellishments you desire (I’ve chosen to use, among others, pearls, sequins, and different forms of glitter)

I always start by applying Gesso as a base for my chipboards, as I find it easier to apply paints and embellishments on a white background, to get the full effects of their colors. But you can skip this step if you so wish, as the effects of certain colors on raw chipboards can be just as interesting.

After applying Gesso, I proceeded to paint only the chipboards that need painting, in my chosen color(s).

Now we’re ready to start embellishing the chipboards.
For the first butterfly, after painting the chipboard wings and body of the butterfly, I used VersaMark to stamp on the body and then applied Utee to the stamped portion and embossed it using a heat gun. I then applied stickles on the embossed bits for some added sparkle and texture. If you do not have a heat gun and/or Utee, you can just stamp on the chipboard with ink without embossing, then apply stickles. Or you can just apply patterns directly onto the chipboard with stickles.

After attaching the body to the wings, I used liquid craft glue to glue on a string of pearls on each wing, starting from the outline of the wing and working my way inwards. This is a bit tricky as you will need to hold the pearls in place while the glue dries!

I finished the butterfly with Prima’s Say It In Crystals as the butterfly’s feelers. I attached the swirls to a piece of firm transparency, and then cut it out and attached the lower part of the transparency to the back of the butterfly.

For the next butterfly, after painting, I covered the wings with tape glue and sprinkled fine glitter on it generously.


I then used liquid craft glue to attach a pattern of sequins to the body and wings. I used strings of sequins so as not to have to glue the sequins down one by one – lol! I then used Prima’s crystals again for the feelers.

For the third butterfly, I covered the body of the butterfly with distress ink, dabbed the entire piece onto my VersaMark pad, and then poured Utee on it and embossed the entire body using a heat gun. If you do not have Utee and/or a heat gun, you can use Glossy Accent instead. It takes longer to dry, but the effect is almost the same.

After glueing the body to the wings, I then applied Glossy Accent to the wings and sprinkled Beadazzles micro beads all over, to cover the entire surface of each wing. You can possibly use liquid craft glue as an alternative to Glossy Accent, but tape glue will not suffice as the micro beads are coarser in texture and heavier than the fine glitter I used for the second butterfly.

For the feelers, I used the same string of pearls that I used for the first butterfly, attaching it to the back of the body with craft glue.

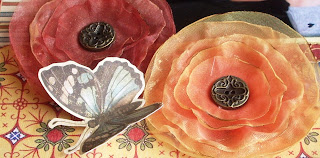
For the next butterfly, I painted the wings and sprinkled some glitter on it while the paint was still wet, and then added gems to decorate. Instead of sprinkling glitter, you can actually use a brush to spread stickles over the dried paint if you like. I then painted the body and glued on beads using liquid glue, and then used a string of butterfly-shaped crystal beads for the feelers.

For yet another butterfly, I glued fabric onto the wings, stickled the patterns on the fabric and then added crystal flourishes. I then painted and stickled the body, added crystals, and used pearls for the feelers.

For the last butterfly, I applied distress ink to just the edges of the wings, stamped on it, and then again dabbed the entire surface with my VersaMark, poured Utee on it and embossed it. Again, you can use Glossy Accent as an alternative. I then silver-embossed the entire body (same method as with the Utee only using silver embossing powder), and added some design to it with stickles. I used a piece of ribbon folded in half for the feelers.

Now, how many chipboards can you use in a single layout, you might ask? In addition to the six butterflies above, I also embellished a piece of Maya Road flourish chipboard for this layout. For this, I lightly applied distress ink on the painted chipboard for depth of color, and then added flowers and crystals for embellishment.

And finally, I also painted the alphas which I used for the title of the layout, with dark brown acrylic paint, and stamp embossed some music notes in silver on alternate letters. I then added crystals for the rest.

And here’s a look at the finished layout – 7 chipboards in all plus the alpha letters for the title!


edit.JPG)


.JPG)